Огляд
- Статистика MasterNode
- Завантаження гаманця з GitHub, та підготовка
- Купівля Pirate на біржах , відправка застави майстерноди на адресу гаманця
- Налаштування сервера Linux
- Керування сервером за допомогою PuTTY(Windows) або Terminal(Mac)
- Налаштування файлу конфігурації майстерноди
Завантаження гаманця з GitHub, та підготовка
- Розпакуйте архів у будь-яке місце, запустіть виконуючий файл.
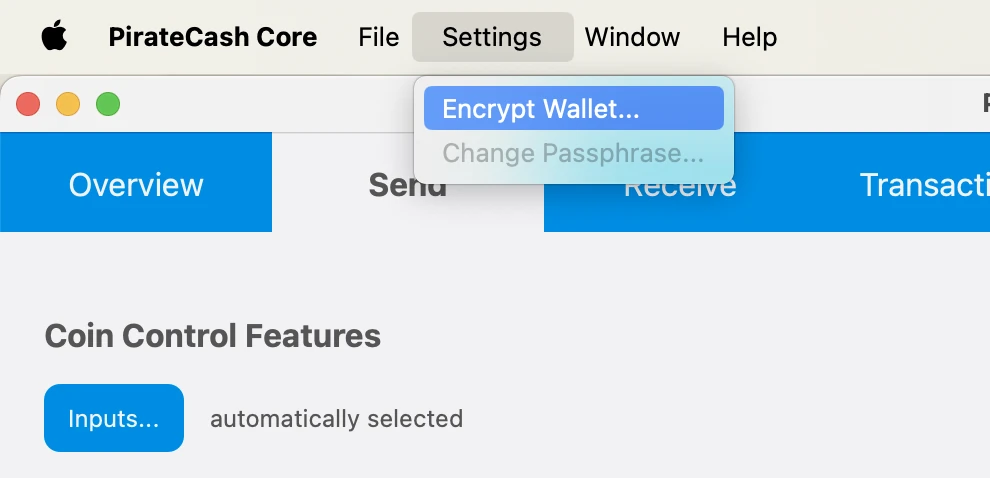
- Встановіть пароль на свій гаманець, Налаштування -> Зашифрувати гаманець, впишіть пароль 2 рази, обов'язково збережіть пароль у надійному місці, перезапустіть гаманець
- Резервна копія: Файл -> Зробити резервну копію гаманця, збережіть створений файл на флешку або на окремому диску, це повна копія вашого гаманця.
Покупка Pirate
Купуйте на будь-якій з бірж трохи більше 10000 Pirate.
Для застави майстерноди потрібна транзакція РІВНЕ 10000 Pirate.
Примітка: вам потрібно придбати трохи більше 10000 Pirate, тому що:
- Біржа візьме комісію за виведення.
- Коли ви відправите 10000 Pirate на адресу гаманця, буде невелика комісія мережі.
- Створіть нову адресу: Отримання -> Нова адреса, надішліть куплені монети Pirate на цю адресу
- Створіть ще одну адресу, надайте йому ім'я MN1, використовуйте в імені адреси лише цифри та латинські літери!!!
- Скопіюйте цю адресу, перейдіть на вкладку Відправлення та вставте скопійовану адресу в поле Одержувач, у полі Мітка у вас має відображатися ім'я адреси MN1.
- Вкажіть суму в полі Кількість РІВНЕ 10000 та натисніть Надіслати.
Створення сервера Лінукс на Digital Ocean
- Зареєструйте обліковий запис, створіть новий дроплет на Digital Ocean. Примітка: Digital Ocean вибраний як приклад, ви можете використовувати будь-який VPS-сервер на ваш розсуд
- Оберіть Ubuntu 22.04 (LTS)
- Мінімальні вимоги 2GB Ram
- Виберіть будь-який регіон
- Запишіть IP адресу вашого сервера
- Перевірте свій e-mail для доступу до сервера
Доступ до сервера
Доступ до сервера через PuTTY - це дозволить вам копіювати та вставляти команди, через web-консоль ви не зможете цього зробити, користувачі MAC можуть використовувати Terminal. Панель запуску -> Пошук -> Термінал -> Введіть: ssh root@IP
- Завантажте та встановіть PuTTY, запустіть програму.
- Введіть у поле Host ip адресу вашого сервера, у поле Saved Sessions введіть ім'я вашого з'єднання та натисніть Save, це дозволить у майбутньому не вводити ip сервера постійно. Виберіть своє з'єднання зі списку та натисніть Open.
- Залогіньтесь під root, пароль від сервера прийде до вас на email, щоб вставити скопійований пароль, достатньо клацнути правою кнопкою миші в терміналі PuTTY. Примітка: вставлений пароль не буде видно, просто натисніть клавішу Enter.
- При першому вході в систему вам буде запропоновано змінити пароль, зробіть це і запишіть його.
Створіть файл підкачування:
fallocate -l 1G /swapfile
chmod 600 /swapfile
mkswap /swapfile
swapon /swapfile
echo "/swapfile none swap sw 0 0" >> /etc/fstab
Конфігурація файлу майстерноди
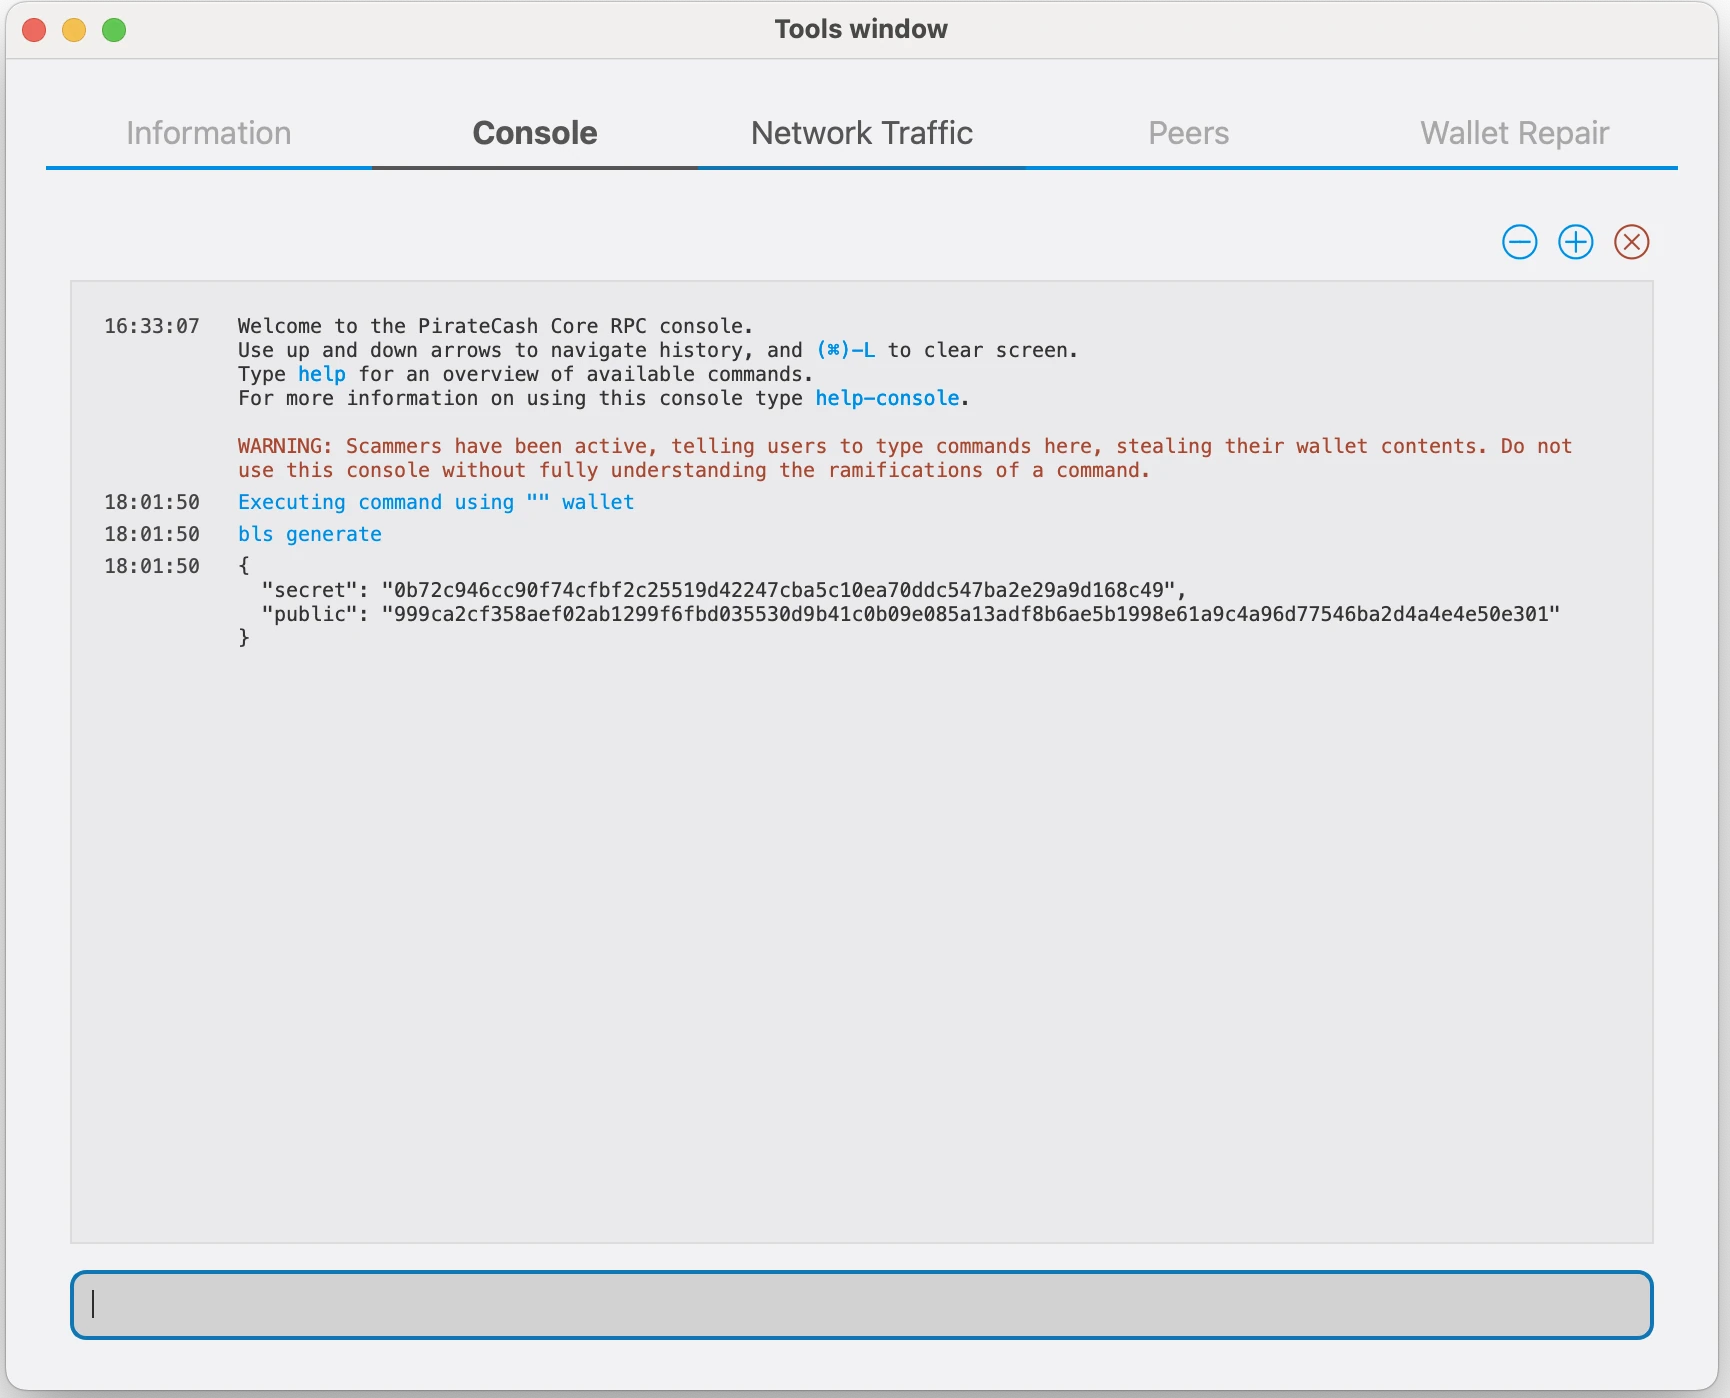
- Запустіть консоль гаманця: Window -> Console
- Введіть: bls generate і натисніть Enter
-
На сервер Завантажте архів гаманця та розархівуйте його, для цього у вікні PuTTY виконайте:
wget https://github.com/piratecash/piratecash/releases/download/v18.1.0/piratecashcore-18.1.0-x86_64-pc-linux-gnu.tar.bz2
bzip2 -dc piratecashcore-18.1.0-x86_64-pc-linux-gnu.tar.bz2 | tar -x
- Створіть директорію mkdir ~/.piratecash
-
Створіть файл ~/.piratecash/piratecash.conf з наступним вмістом:
rpcuser=XXXXXXXXXXXXX
rpcpassword=XXXXXXXXXXXXXXXXXXXXXXXXXXXX
rpcallowip=127.0.0.1
server=1
rest=1
listen=1
txindex=1
listenonion=0
maxconnections=700
masternodeblsprivkey=
externalip=XXX.XXX.XXX.XXX
Replace the fields marked with XXXXXXX as follows:
rpcuser: enter any string of numbers or letters, no special characters allowed
rpcpassword: enter any string of numbers or letters, no special characters allowed
externalip: this is the IP address of your VPS
Please fill masternodeblsprivkey field commented by execute command bls generate in console and restart piratecashd daemon.
- Запустіть гаманець: ./piratecashd
-
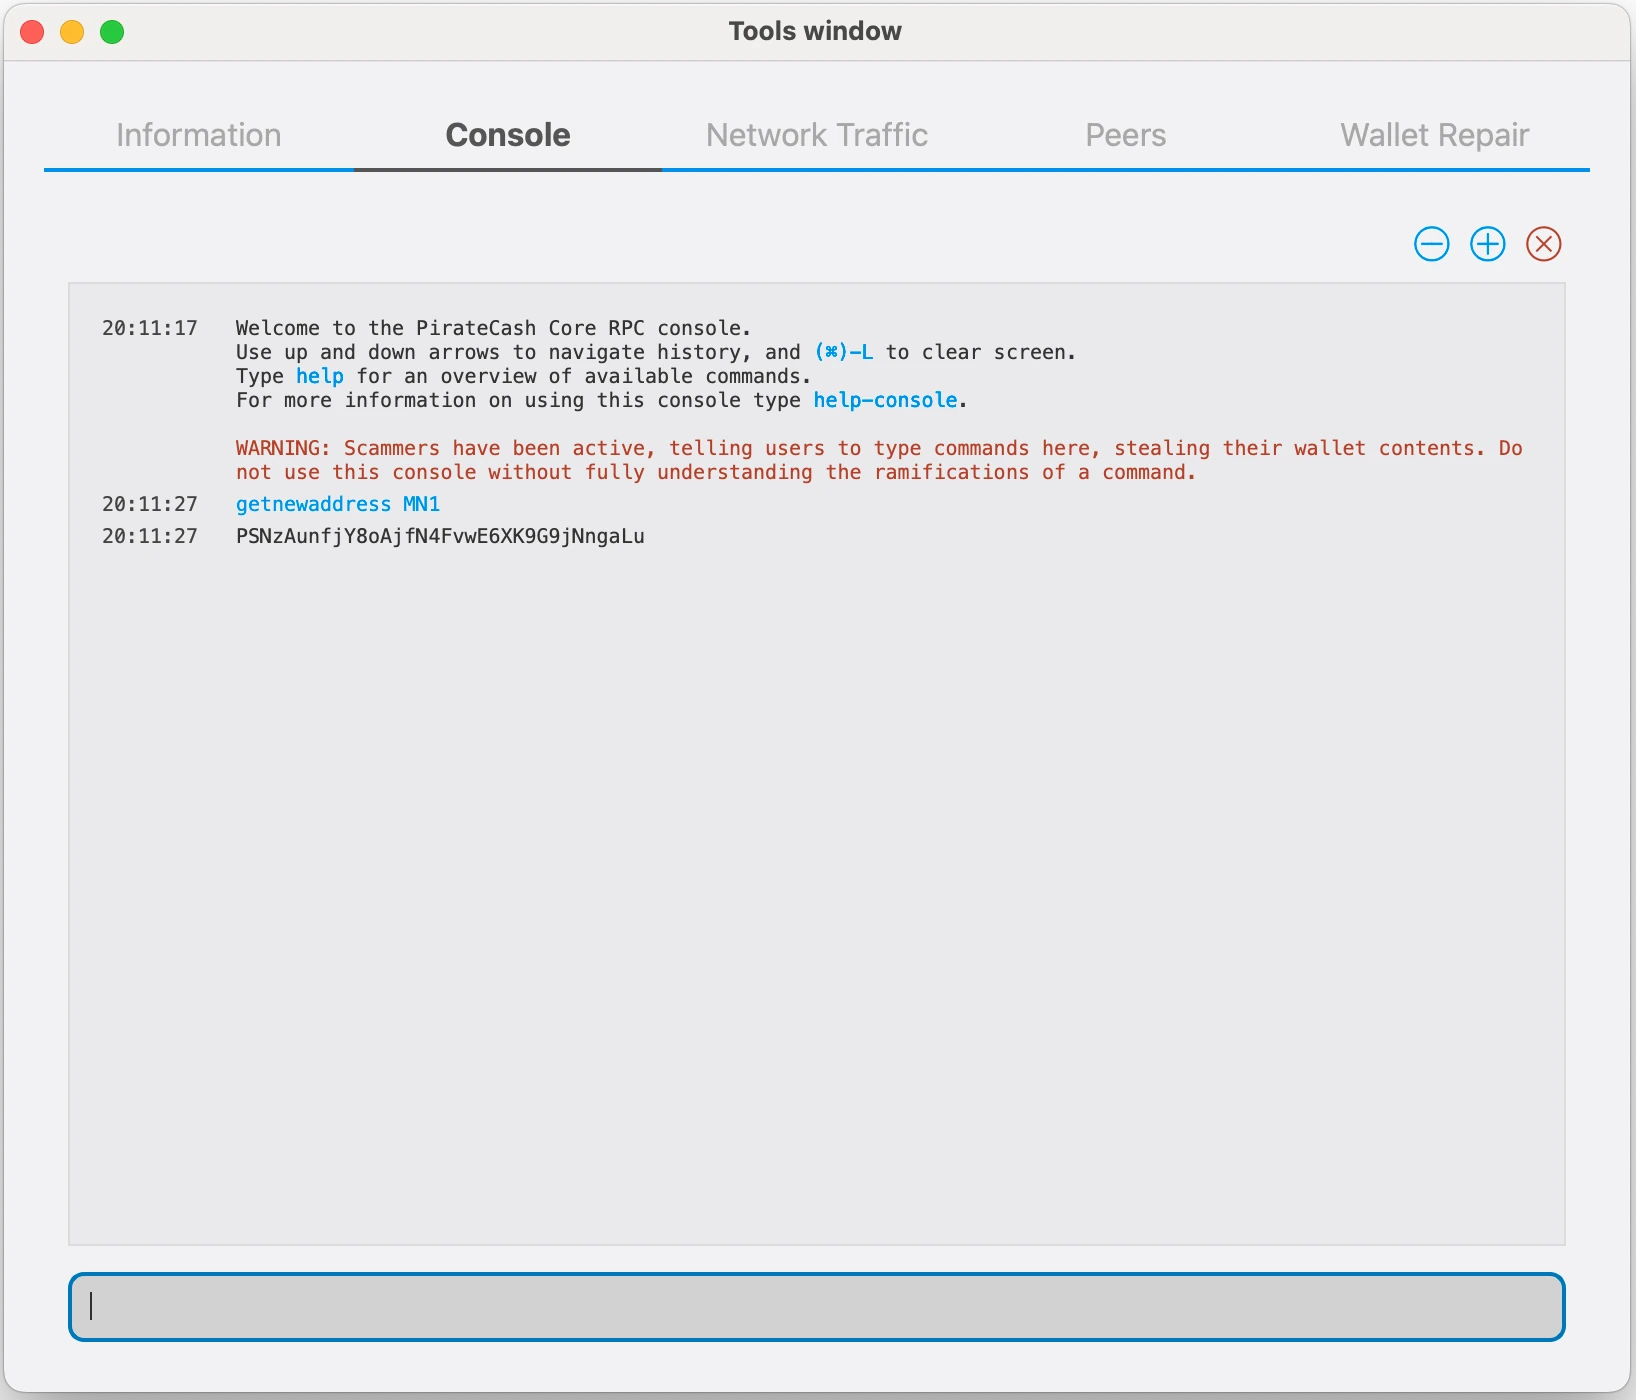
Click Window -> Console to open the console. Type the following command into the console to generate a new PirateCash address for the collateral:
getnewaddress MN1
-
To send 10,000 PIRATE to this address via @piratecash_bot, you need to go to the 💵 Balance → PirateCash → 📤 Withdraw️ menu or execute the command /withdraw_pirate.

-
After the transaction is completed, various keys related to the transaction need to be extracted for later inclusion in a configuration file and registration transaction. This registration transaction serves as proof, recording the configuration on the blockchain and ensuring the masternode’s inclusion in the deterministic list. Plase execute masternode outputs
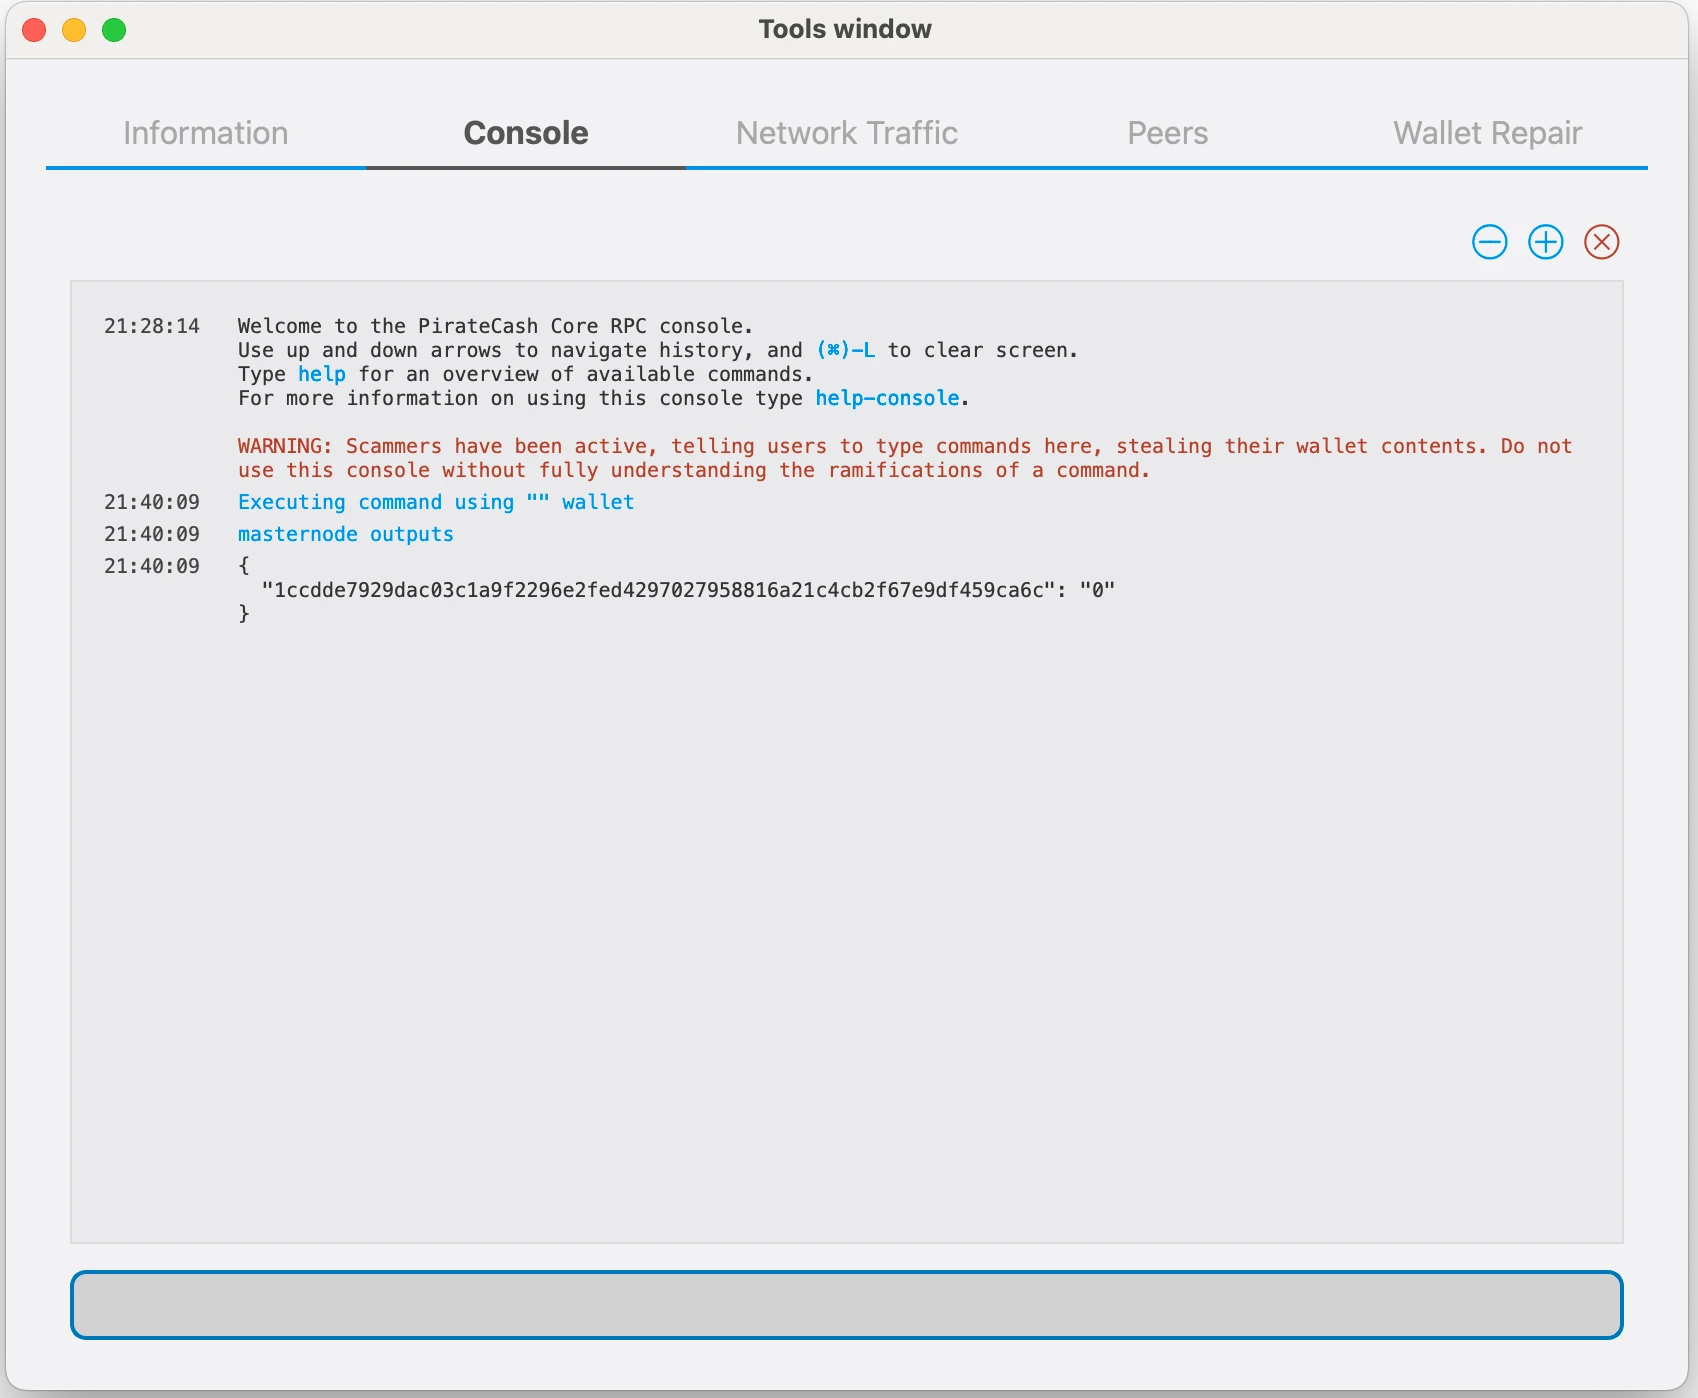
-
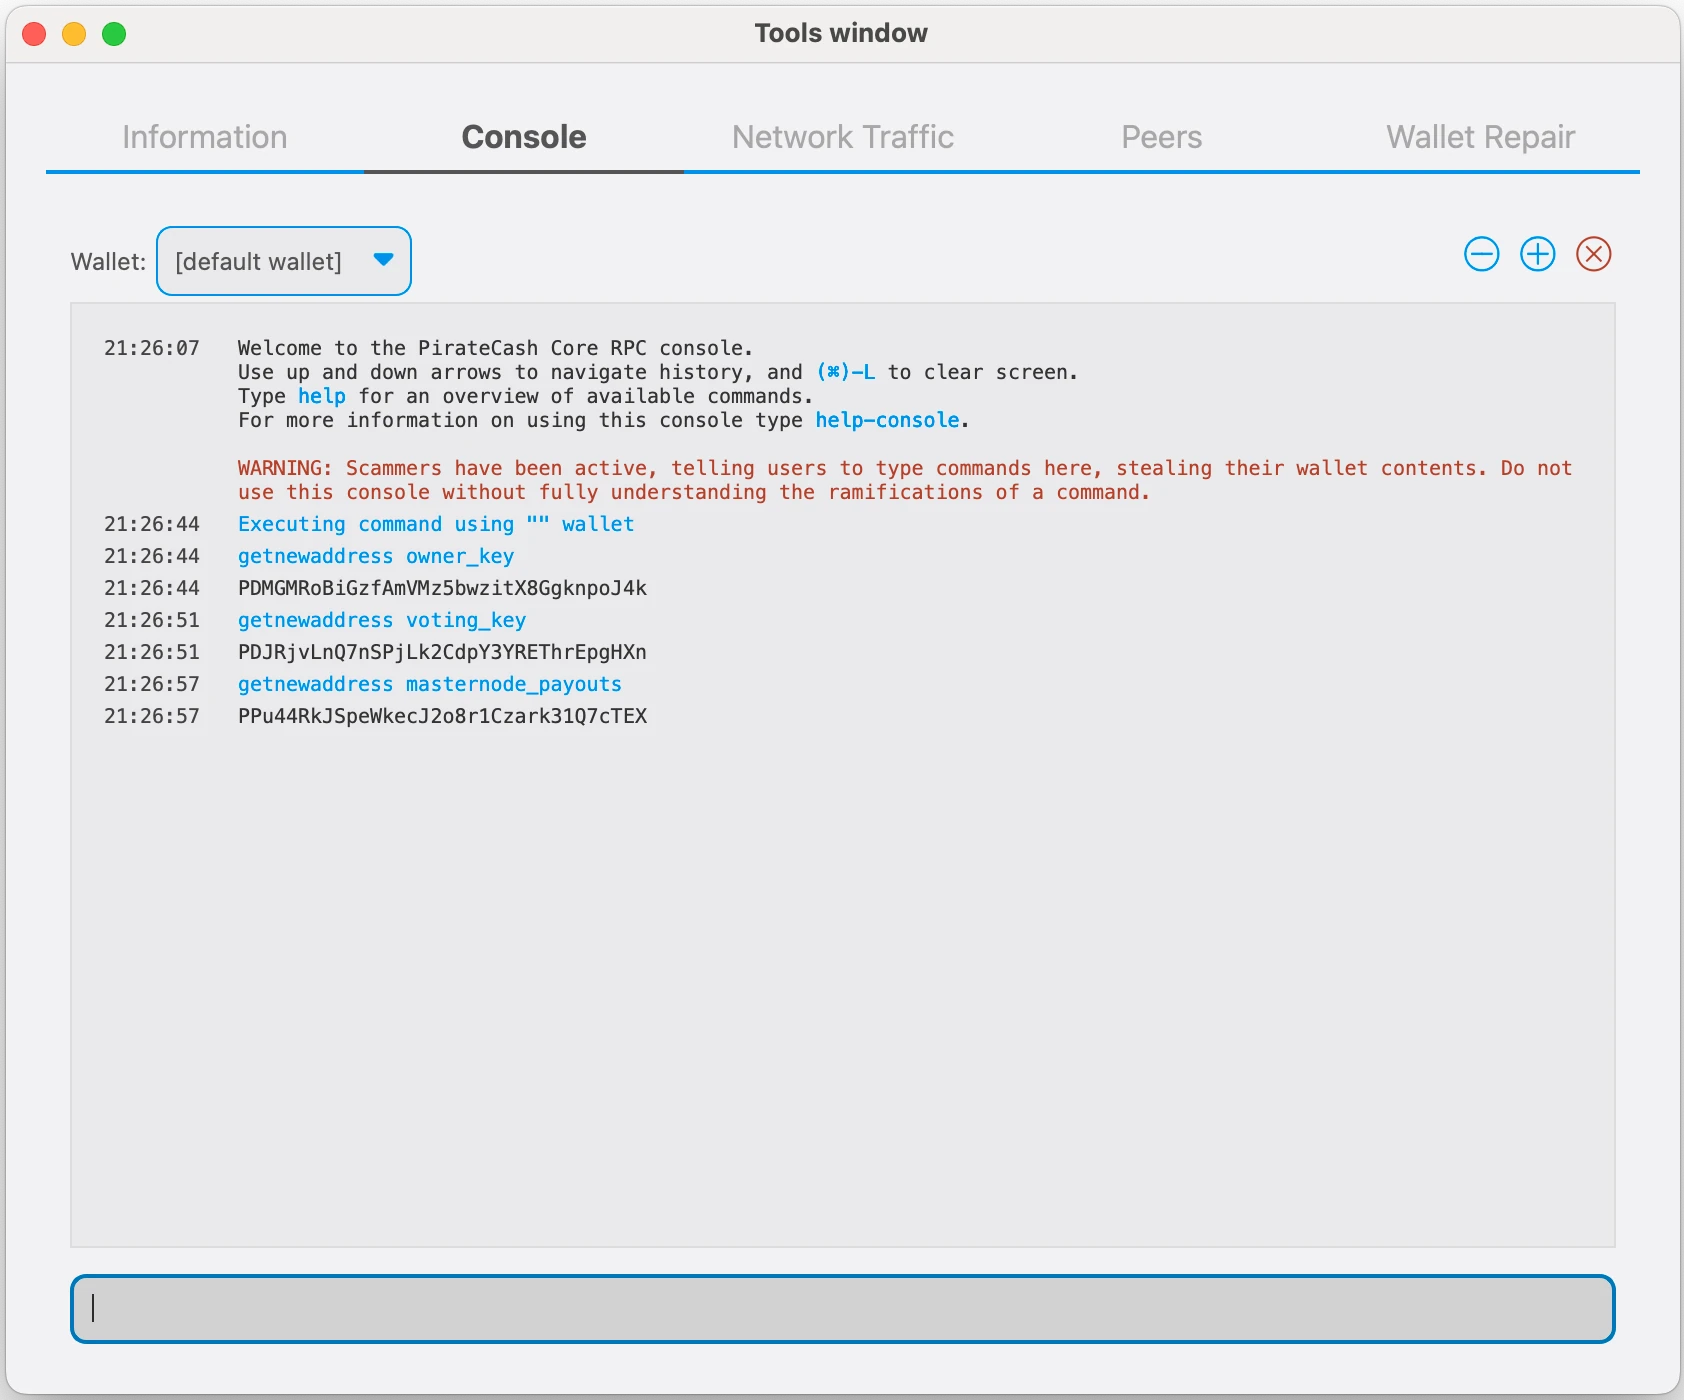
Prepare a ProRegTx transaction
First, we need to get a new, unused address from the wallet to serve as the owner key address (ownerKeyAddr). This is not the same as the collateral address holding 10,000 PIRATE. Generate a new address as follows:
getnewaddress owner_key
-
This address can also be used as the voting key address (votingKeyAddr). Alternatively, you can specify an address provided to you by your chosen voting delegate, or simply generate a new voting key address as follows:
getnewaddress voting_key
-
Then either generate or choose an existing address to receive the owner’s masternode payouts (payoutAddress). It is also possible to use an address external to the wallet:
getnewaddress masternode_payouts
-
You can also you need to generate and fund another address as the transaction fee source(feeSourceAddress). If you selected an external payout address, you must specify a fee source address:
getnewaddress pay_fees
-
We will now prepare an unsigned ProRegTx special transaction using the protxregister_prepare command. This command has the following syntax
protx register_prepare collateralHash collateralIndex ipAndPort ownerKeyAddr operatorPubKey votingKeyAddr operatorReward payoutAddress feeSourceAddress
Open a text editor such as notepad to prepare this command. Replace each argument to the command as follows:
collateralHash: The txid of the 10,000 PIRATE collateral funding transaction
collateralIndex: The output index of the 10,000 PIRATE funding transaction
ipAndPort: Masternode IP address and port, in the format x.x.x.x:63636
ownerKeyAddr: The new PirateCash address generated above for the owner/voting address
operatorPubKey: The BLS public key generated above (or provided by your hosting service)
votingKeyAddr: The new PirateCash address generated above, or the address of a delegate, used for proposal voting
operatorReward: The percentage of the block reward allocated to the operator as payment
payoutAddress: A new or existing PirateCash address to receive the owner’s masternode rewards
feeSourceAddress: Address used to fund ProTx fee. payoutAddress will be used if not specified.

-
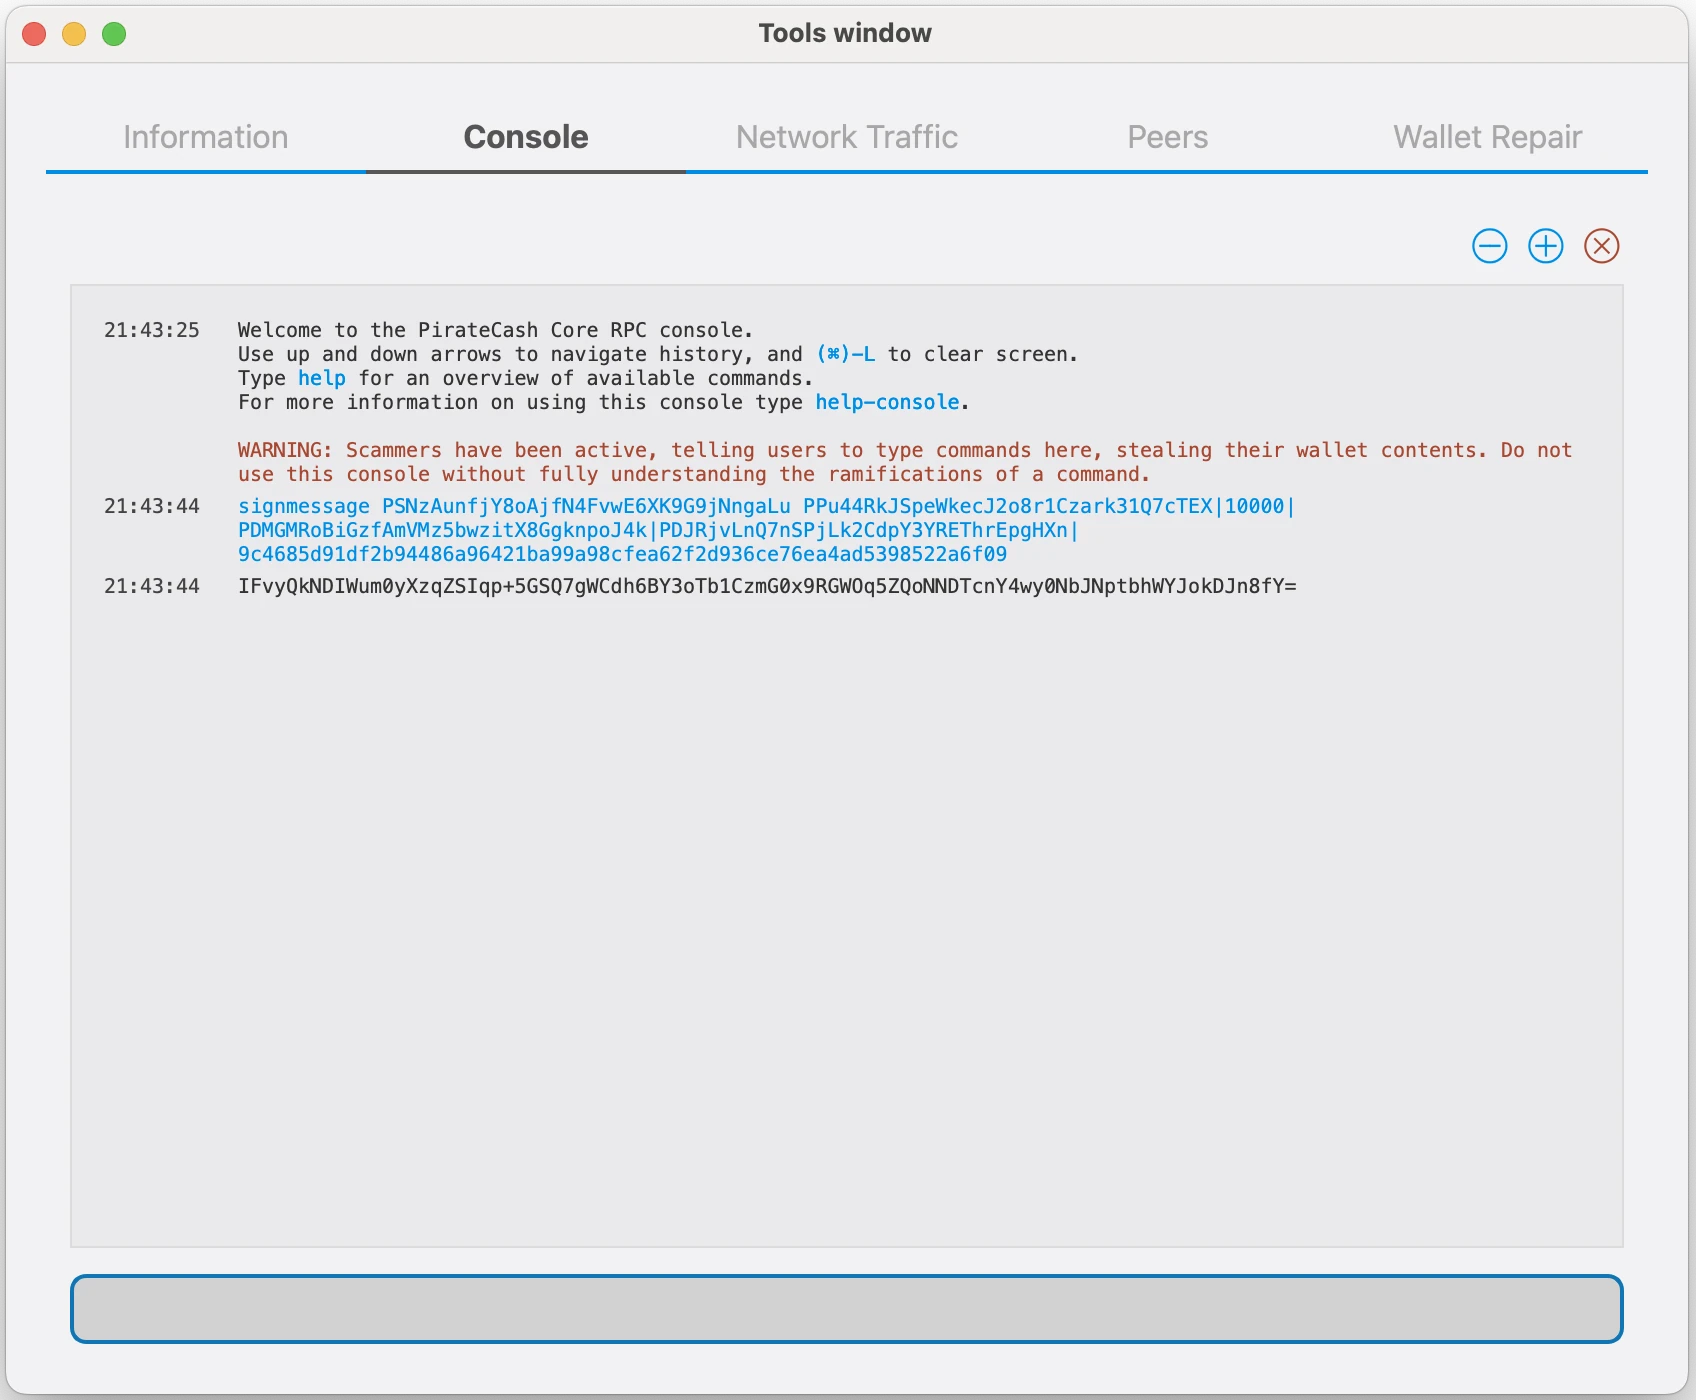
Sign the ProRegTx transaction
We will now sign the content of the signMessage field using the private key for the collateral address as specified in collateralAddress. Note that no internet connection is required for this step, meaning that the wallet can remain disconnected from the internet in cold storage to sign the message. In this example we will again use PirateCash Core, but it is equally possible to use the signing function of a hardware wallet. The command takes the following syntax:
signmessage collateralAddress signMessage
-
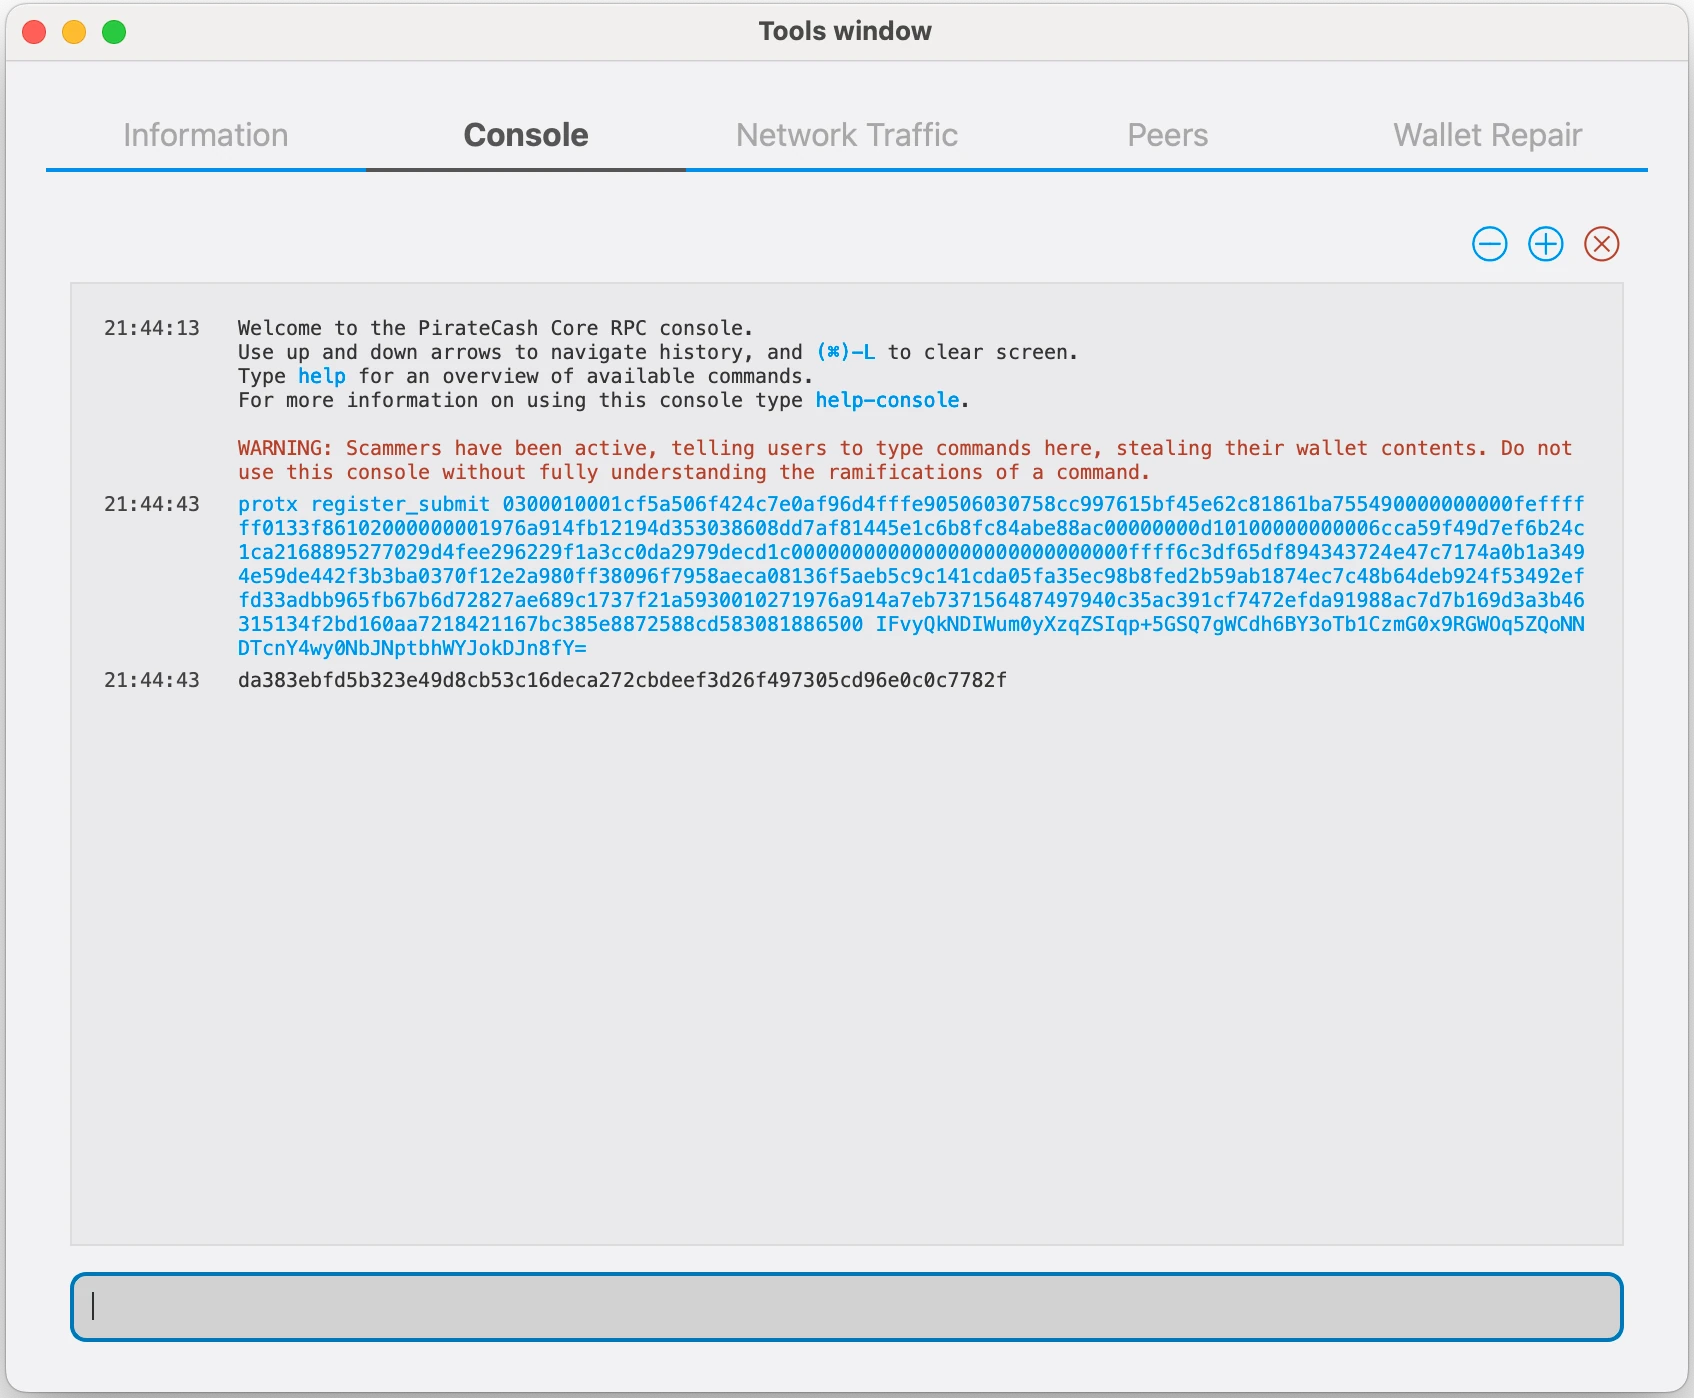
Submit the signed message
We will now submit the ProRegTx special transaction to the blockchain to register the masternode. This command must be sent from a PirateCash Core wallet holding a balance on either the feeSourceAddress or payoutAddress, since a standard transaction fee is involved. The command takes the following syntax:
protx register_submit tx sig
tx: The serialized transaction previously returned in the tx output field from the protx register_prepare command
sig: The message signed with the collateral key from the signmessage command
-
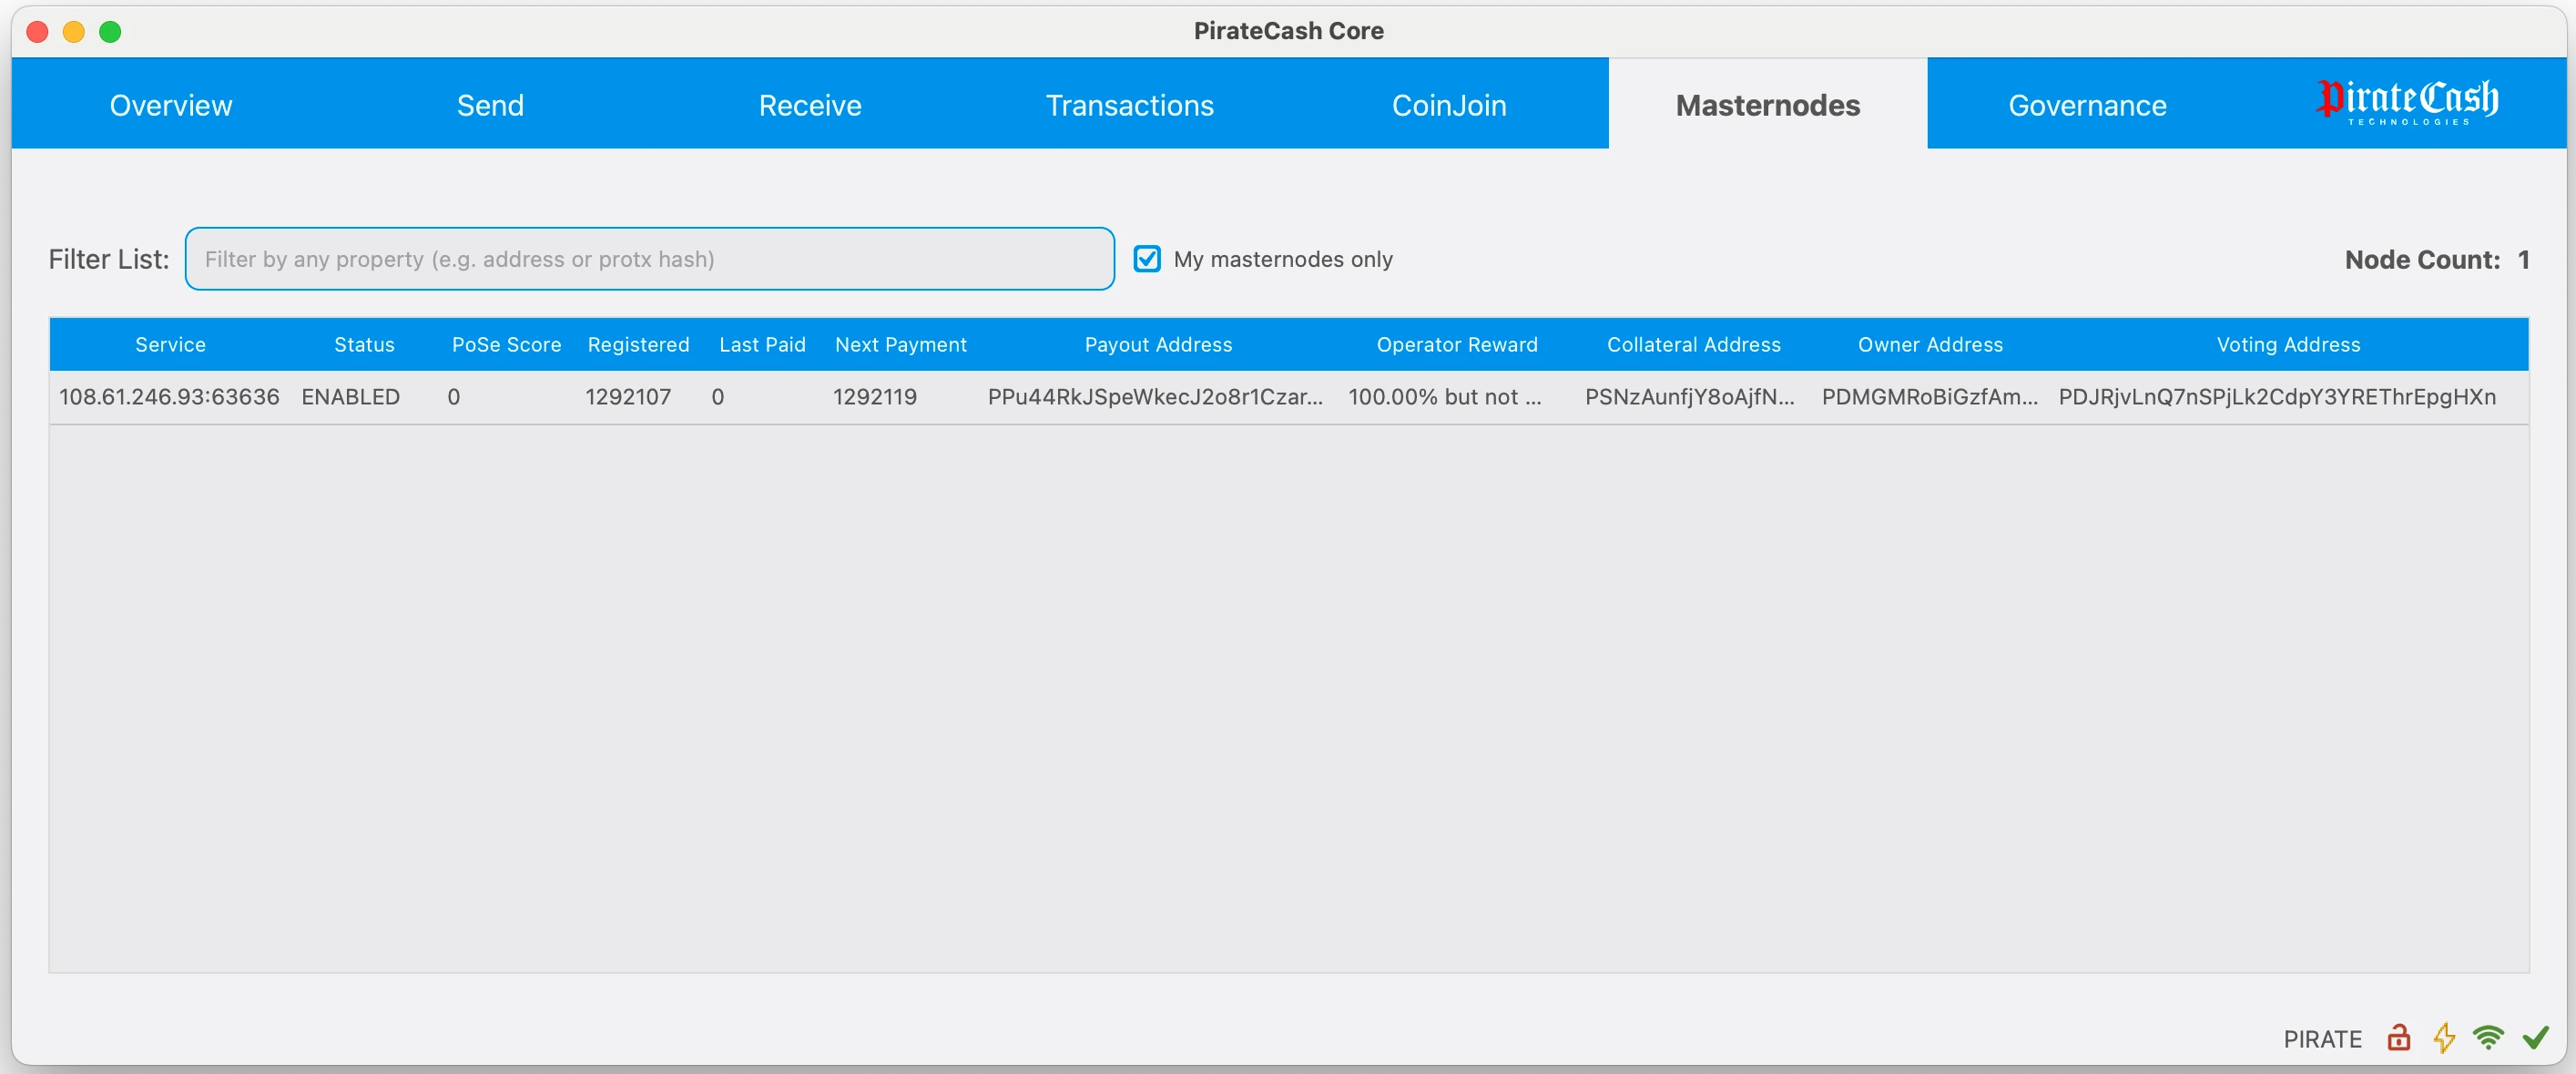
Your masternode is now registered and will appear on the Deterministic Masternode List after the transaction is mined to a block.